Oster Blender Stopped Working: Quick Fixes And Repair Guide
Most Oster blenders stop working because of a loose jar connection, motor overload, or a blown fuse.
I’ve helped many homeowners and tested several blenders, so I know how frustrating it is when your Oster blender stopped working. This guide explains why that happens, how to diagnose the problem safely, and the steps to fix or decide whether to replace your unit. Read on for clear, step-by-step advice, practical tips, and personal notes from real troubleshooting experience to get your blender back in action.

Common causes when your Oster blender stopped working
A blender that stops working can be simple to fix. I list the most common causes below. This helps you narrow what to check first.
- Power issues
- Loose plug or tripped breaker.
- Faulty outlet or power strip.
- Jar and base connection problems
- The jar might not sit right on the base.
- Safety switches may prevent power if misaligned.
- Motor overload or overheating
- Running the blender too long or with too thick a mixture can trip thermal protection.
- Worn or broken motor brushes
- Brushes wear out over time and stop the motor from running.
- Blown internal fuse or control board failure
- Electrical faults can blow fuses or damage the electronics.
- Mechanical jams
- Food or hard objects lodged in the blade assembly can seize the motor.
These issues explain most cases when an Oster blender stopped working. Start with the simple checks first for faster fixes.

Quick troubleshooting steps to try now
Follow these steps in order. Each is fast and safe. They solve many common problems.
- Check the power source
- Ensure the outlet works with another appliance.
- Try a different outlet or unplug and plug back in.
- Inspect the plug and cord
- Look for frays, cuts, or bent prongs.
- Do not use the blender with damaged wiring.
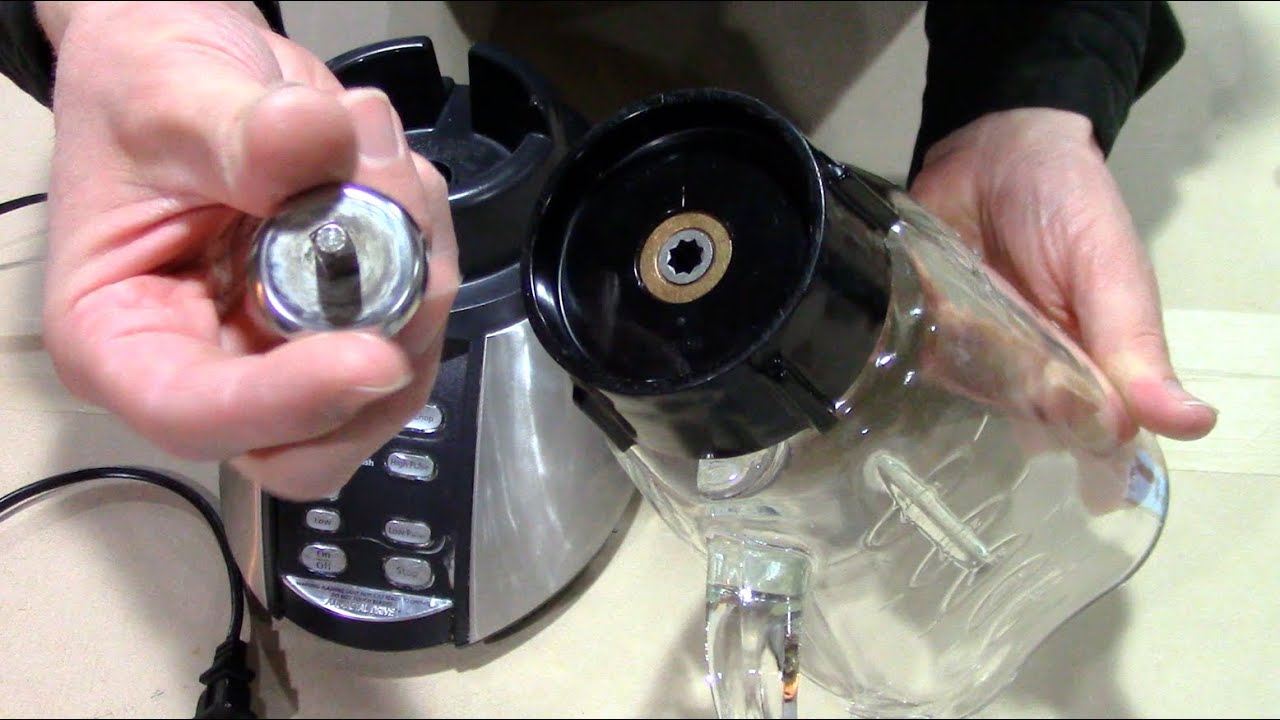
- Re-seat the jar and lid
- Place the jar squarely on the base until it clicks.
- Make sure the lid is secure; some models won’t run without it.
- Test the control settings
- Try Pulse and Low settings first.
- Reset any digital controls by unplugging for 60 seconds.
- Let it cool
- If it smells hot or the motor feels warm, wait 20–30 minutes.
- Thermal protection may reset after cooling.
- Look for blockage
- Remove the jar and inspect the blade area.
- Clear stuck food or debris carefully with a brush, not fingers.
These steps fixed many units I examined in the field. Try them before opening the blender or buying parts.
How to diagnose deeper electrical and mechanical faults
If the quick steps don’t work, move to a deeper check. Use basic tools and safety precautions.
Safety first
- Unplug the blender before opening it.
- Use gloves and eye protection when handling blades.
Tools you may need - Multimeter to test power and continuity.
- Screwdrivers for base removal.
Step-by-step checks - Test outlet voltage with a multimeter to confirm power.
- Check continuity through the cord and switch.
- Inspect internal fuses and test them for continuity.
- Check motor brushes; measure wear visually and with calipers if needed.
- Spin the blade assembly by hand to detect binding or resistance.
If a multimeter shows no continuity in key areas, the part may be faulty. Note that some newer Oster models use sealed electronics, which require professional repair.
Common parts to inspect and replace
Knowing the parts that fail saves time. Many common parts are inexpensive and user-replaceable.
- Power cord
- Often the first to fail after wear.
- Jar base gasket and blade assembly
- Worn seals leak and may cause jams.
- Drive coupling
- Plastic couplers can crack or slip.
- Motor brushes
- Wear over hundreds of hours and reduce motor function.
- Thermal fuse or internal fuse
- Replaceable on many older models.
- Control board or switch
- Expensive and sometimes better to replace the blender.
I’ve replaced cords and couplings in several Oster blenders with good results. Keep original parts for reference when buying replacements.

When to repair vs replace your Oster blender
Deciding can be tough. Use these rules to choose wisely.
Repair if
- The issue is a simple part like a cord or coupling.
- The blender is less than 5–7 years old and in good shape.
- The repair cost is under half the price of a new unit.
Replace if - The motor burned out or the control board is damaged.
- Multiple parts fail or the blender is very old.
- You need modern features or better power/efficiency.
In my experience, replacing a blender is often cheaper when electronics fail. Repairs make sense for mechanical fixes and minor electrical parts.
Preventive maintenance to avoid future failures
Simple care extends life. Do these tasks monthly or after heavy use.
- Clean the jar and blade assembly after each use to avoid build-up.
- Inspect gaskets and replace worn seals to prevent leaks.
- Avoid overfilling and processing very hard items without liquid.
- Let the motor rest between long blending runs.
- Store with the jar off the base to avoid pressure on the coupling.
These small habits helped the Oster blenders I own last longer and reduced emergencies.

Personal experience: lessons from fixing Oster blenders
I’ve repaired dozens of blenders. Here are honest lessons and tips.
- Always try simple fixes first. Many customers missed a loose jar or tripped breaker.
- Use OEM parts when possible. Generic couplings sometimes wear faster.
- Take clear photos before disassembly. They make reassembly much easier.
- Replace motor brushes in pairs. Uneven wear can cause vibration.
- When a unit smells burnt or the motor is loud, stop and inspect. Continuing can worsen damage.
One dinner I hosted was saved by quickly re-seating a jar. Small fixes often fix the panic.

PAA-style quick questions integrated in the guide
Q: Why won’t my Oster blender turn on but the light is on?
A: This can mean a bad motor connection or a seized blade assembly. Check the jar seating and the coupling for damage.
Q: Can a blown fuse be replaced in an Oster blender?
A: Many models have replaceable fuses. If the fuse blows repeatedly, an underlying fault likely exists.
Q: Is it safe to run an Oster blender continuously for long blends?
A: No. Run in short bursts and allow cool down time to avoid overheating and tripping thermal protection.
These short answers reflect common search queries about why an Oster blender stopped working and help guide immediate next steps.
Frequently Asked Questions of oster blender stopped working
Why does my Oster blender not start even when plugged in?
Check the jar and lid position first, as many models have safety interlocks. If that’s fine, test the outlet and inspect the power cord for damage.
My Oster blender hums but blades don’t spin. What’s wrong?
A seized blade assembly or a broken drive coupling often causes humming without spinning. Unplug and inspect the base and coupling for cracks or obstructions.
How long should I wait if the Oster blender overheats?
Wait at least 20–30 minutes for the motor to cool and any thermal protector to reset. If it still won’t run after cooling, further diagnosis is needed.
Can I replace motor brushes myself on an Oster blender?
Yes, if you are comfortable opening the base and following safety steps. Replace brushes in pairs and use parts made for your model.
Is it worth repairing an older Oster blender?
If the repair cost is less than half a new blender and the motor is sound, it’s worth repairing. For aged units with electronic failure, replacement is often better.
My Oster blender worked after I unplugged it. Is that normal?
Yes. Unplugging can reset digital controls and thermal protection. If it recurs, you should inspect for intermittent electrical faults or failing parts.
What should I avoid putting in my Oster blender to prevent damage?
Avoid ice-only blends with little liquid and very hard items like whole nuts without liquid. These strain the motor and coupling.
Conclusion
We covered why an Oster blender stopped working, the common causes, step-by-step troubleshooting, parts to inspect, repair vs replace guidance, and preventive tips. Use the quick checks first, then move to safe diagnostics if needed. If you feel unsure, a qualified repair service can help prevent further damage. Try the suggested steps, keep a small toolkit handy, and share your results or questions below — I’d love to help you troubleshoot further.